Monday 29 February 2016

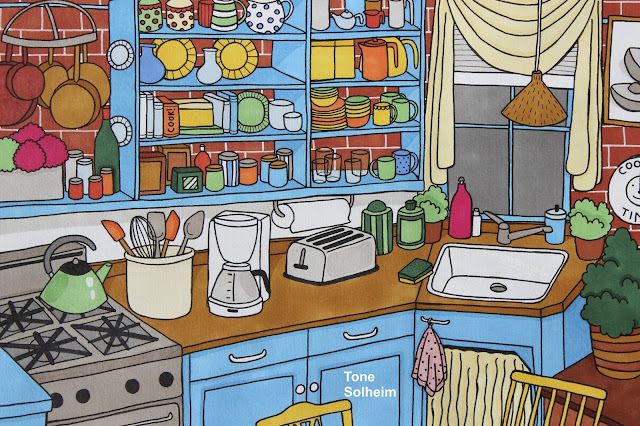
Monica's kitchen: Step by step

I've been on a Friends roll lately, watching up to several episodes a day (it's a great series to have playing while I'm doing the dishes, for example!), and seeing as it's one of my all time favourites, I thought it only fitting that I draw some sort of tribute. 

After some deliberation the choice fell on Monica's homely kitchen! I started, as always, with a pencil sketch: 


Then I did the tracing with a black liner: 


And, because of dear old Murphy (and the fact that I'd painted my nails the day before), this happened:


(Damn that orange nail polish!)

But, like I've mentioned before on this blog, most errors and mishaps can be fixed with a bit of know how. So instead of despairing I quickly moved on to the next step: Colouring everything in:


My favourite part of any drawing is by far the final tracing and the adding of details - it's really what ends up making the drawing in the end. It's all in the details!

The final result:


The filling of the cupboards was a real pain (it took ages), but I'm pretty happy with the result: 


And, of course, Monica's kitchen just wouldn't be complete without the Cookie Time clock: 


-

What do you think of my 'interpretation' of Monica's kitchen? Does it look like it's supposed to?

Thursday 25 February 2016

Beastly babes

A while ago I drew a mini-series of beastly babes. My favourite is the satyr!


Which beastly babe do you prefer?

Tuesday 23 February 2016

Favourite illustrators on Instagram (part I)

Since I joined Instagram a while back (check out my account here) I've discovered many wonderful illustrators. I thought it would be nice to share some of my favourites with you. 


(All images have been linked to their original source)

-

Do you have a favourite illustrator?


Sunday 21 February 2016

Monthly Makers February: Wood

I've been a fan of Monthly Makers for a good while now, but it was only at the beginning of this year that I decided I wanted to join. If you do not know what Monthly Makers is you can have a look at their Facebook page (it's in Swedish, mind). 

This month's topic was 'trä' (wood). Since I live in an apartment complex with neighbours all around, it didn't feel right to hammer away at some big and (most likely) noisy wooden project, so instead I went for a quieter solution: I 'built' a tree house on a sheet of paper! 


I never had a tree house growing up, but always wanted one. Now my wish has finally come true! I equipped my tree house with red polka dot curtains and flowers to make it extra cozy:


And added a picnic as well, because, let's face it - picnics are the best (especially the ones that involve cake):


And, of course, birds chirping happily away in the tree (it was only after colouring them in that I realised they now look like Easter chicks - oh well): 


All in all I'm satisfied with my newly constructed tree house!


I'm really looking forward to see what the other participants have come up with, and what the theme for March will be. So excited! 

Saturday 20 February 2016

Flower girls: Step by step

I thought it would be fun to show you all how I draw. Not line by line, as that would take forever and a half, but rather step by step. 

All my drawings start with an idea. Usually this is a very loose idea, and it always (no exceptions) changes as I go along. Today I knew I wanted to draw two girls, and I knew I wanted flowers to be involved. At first I thought about giving them both flower crowns but quickly decided against it, as it would take the focus away from the the girls themselves. I started off, as always, by making a quick pencil sketch: 


I usually use a regular HB pencil when I sketch (I find that B-pencils tend to smudge easily and thus make the lines harder to remove afterwards, and that H-pencils are too hard on the paper), but this is just my personal preference. Today my favourite pencil had gone missing (damn those house elves!) so I had to make do with one of my reserve pencils. 

Once I'm satisfied with the initial sketch, I trace the lines with a pigment liner: 


At the moment I'm using both Faber-Castell's ECCO pigment liners and Staedtler's pigment liners, as I can't for the life of me figure out which brand I prefer. 

Once the tracing is done, I erase all visible pencil marks: 


Normally tracing is a piece of cake. This time, however, the liner slipped (so annoying), and the girls' lips ended up looking like this: 


But I did not despair! Most liner mishaps can be corrected. This time I fixed it by giving my girls black lipstick. I was originally planning on giving them red lips, but like I mentioned above, the initial idea always changes:


A wee side note: I hate how my drawings look at this stage (pictured above). I always feel they look both boring and bland and bah with just the initial layer of markers. But once I've added multiple layers and retraced the drawing with a ticker liner, I'm usually a lot happier with the finished result: 


I actually feel the black lips and the matching collars make the drawing 'pop' a lot more than it would have had the lips been red like I'd originally planned. I guess that's what you call a lucky mistake!

-

Did you enjoy this step by step post? Should I make more posts like this in the future?